Zabbix supervision on a remote infrastructure with proxy and PSK-based encryption
All of CozyCloud’s production and development infrastructure is hosted in OVH’s datacenters. We monitor this infrastructure in two ways: by sending data points on various metrics to OVH’s Metrics Data Platform (I’ll write about that in a future post), and also by using a self-hosted Zabbix server.
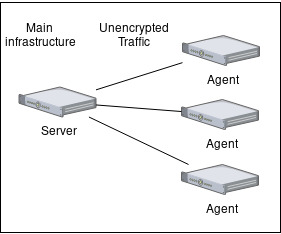
All of our OVH hosts are connected to a virtual local network (vRack) that cannot be accessed from the outside world, so on-host Zabbix agents use it to send their unencrypted data to the Zabbix server, which is also connected to this local network. It was a very simple setup, which looked like this:
A new challenger approaches
Recently, we’ve been tasked with the setup of a new production infrastructure on another hosting provider. The question of how we were going to set up Zabbix’s monitoring in this new environment came up quickly. We decided not to set up another Zabbix server on the new hosting provider’s infrastructure as it would make things painful to set up and we’d have two places to watch instead of only one. So we decided that all Zabbix agents monitoring host on the remote infrastructure would send their data to the Zabbix server we already had set up on OVH’s infrastructure.
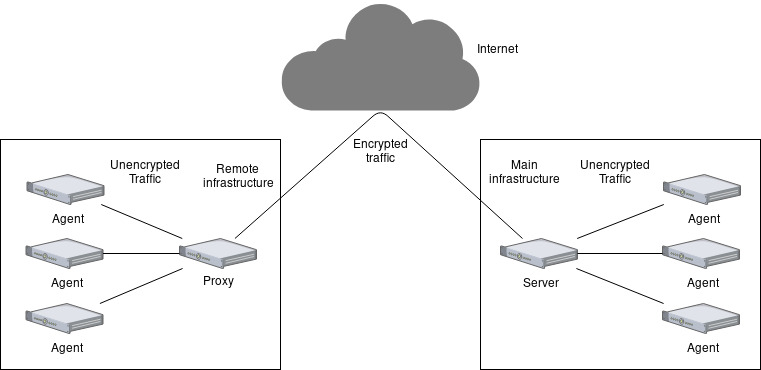
Now, this brought up an issue that needed solving before we could do anything: there’s no private local network linking the two hosting providers, so the traffic between the two goes through the Internet with neither encryption nor checksum. Luckily, Zabbix provides an encryption feature, and a proxy software which forwards data from agents to a server, so we decided that we would set up a Zabbix proxy on the remote infrastructure and would turn encryption on between the proxy and the Zabbix server. The resulting setup would look like this:
Let’s encrypt stuff
Let’s have a look at how we’ll encrypt the traffic between the proxy and the server. Zabbix actually provides three modes to describe encryption for incoming or outgoing connections:
- unencrypted: the data is sent in plain text over the Internet (aka what we don’t want).
- PSK (aka Pre-Shared Key): an encryption key that must be shared between the proxy and the server and is used to encrypt and decrypt the data.
- Certificate-based: a PEM certificate signed by a certification authority (either public or in-house) must be generated; the CA’s certificate must be provided to the Zabbix server and is used to validate the certificates used by the proxy.
Because it was simpler to set up, we went with the PSK option. However, our Zabbix server was built and installed from the sources, with the --with-openssl option, and Zabbix’s doc on encryption states the following:
If you plan to use pre-shared keys (PSK) consider using GnuTLS or mbed TLS libraries in Zabbix components using PSKs. GnuTLS and mbed TLS libraries support PSK ciphersuites with Perfect Forward Secrecy. OpenSSL library (versions 1.0.1, 1.0.2c) does support PSKs but available PSK ciphersuites do not provide Perfect Forward Secrecy.
And since we had to update the server anyway, one of my colleague thought he would create an unofficial package (for internal use) from the sources. Why not use the official Debian packages, you ask? Because the packages coming from the official Debian repos are outdated, and we couldn’t find whether the packages coming from Zabbix’s official repos were built using OpenSSL or GnuTLS. This way, we were sure to use the latest Zabbix version with the best encryption settings.
I’m explaining this because it means we’re not using the official packages, which means that, although the setup process should be roughly the same, some steps may differ from the official from-packages install.
At this point, we have our internal packages of the Zabbix server, proxy and agent, and I was tasked to set up the whole thing on the remote infrastructure.
The proxy: a walkthrough
I’ll begin with the assumption that you already have a running Zabbix server somewhere on the Internet.
First, you need to install the Zabbix proxy. This should be as simple as running
sudo apt install zabbix-proxy-BACKEND
but can be a bit more complicated if you’re installing the proxy from the sources. Either way, it’s all documented.
In my case, once I created the proxy’s PostgreSQL user and database, I also had to manually load the database schema into PostgreSQL, or else the proxy wouldn’t start. If that’s your case, find the schema.sql or schema.sql.gz file installed on the proxy’s host by the sources or the package, un-compress it using gunzip if necessary, then enter the PostgreSQL shell (psql -U PROXY USER -d PROXY DATABASE), and run \i /path/to/schema.sql. This will do all the necessary operations to make the database usable by the proxy.
Now let’s configure the proxy. The configuration file we use, located at /etc/zabbix/zabbix_proxy.conf looks like this:
# Proxy operating mode.
# 0 - proxy in the active mode
# 1 - proxy in the passive mode
ProxyMode=0

# IP address (or hostname) of Zabbix server.
Server=ZABBIX SERVER IP/HOSTNAME

# Unique, case sensitive Proxy name.
Hostname=zabbix-proxy

# Log file name
LogFile=/var/log/zabbix-proxy/zabbix_proxy.log

# Database name.
DBName=POSTGRES DB NAME

# Database user.
DBUser=POSTGRES USER

# Database password.
DBPassword=POSTGRES PASSWORD

# How often proxy retrieves configuration data from Zabbix Server in seconds.
# For a proxy in the passive mode this parameter will be ignored.
# The default is 3600, which is an hour. We don't want to wait up to an hour
# for a new host to start being supervised.
ConfigFrequency=300

# How long we wait for agent, SNMP device or external check (in seconds).
Timeout=4

# How long a database query may take before being logged (in milliseconds).
# Only works if DebugLevel set to 3 or 4.
LogSlowQueries=3000

# How the proxy should connect to Zabbix server, aka the encryption mode we want
# to use.
TLSConnect=psk

# Unique, case sensitive string used to identify the pre-shared key.
TLSPSKIdentity=psk_remote
# Full pathname of a file containing the pre-shared key.
TLSPSKFile=/etc/zabbix/zabbix_proxy.psk
Some values have been censored because they contain sensible data (such as secrets or passwords).
Let’s give a closer look at some parts of this file.
# Proxy operating mode.
# 0 - proxy in the active mode
# 1 - proxy in the passive mode
ProxyMode=0
This means that the proxy runs in the active mode, and will fetch by itself its configuration on the server. This mainly means we don’t have to restart the proxy each time we add a host.
# IP address (or hostname) of Zabbix server.
Server=ZABBIX SERVER IP/HOSTNAME

# Unique, case sensitive Proxy name.
Hostname=zabbix-proxy
This part tells the proxy what server it should contact and what name must it give to be recognised as itself. The first parameter would be ignored if we were running in passive mode.
# Database name.
DBName=POSTGRES DB NAME

# Database user.
DBUser=POSTGRES USER

# Database password.
DBPassword=POSTGRES PASSWORD
This part tells the proxy how to connect to its database. In this case we’re using PostgreSQL.
# How the proxy should connect to Zabbix server, aka the encryption mode we want
# to use.
TLSConnect=psk

# Unique, case sensitive string used to identify the pre-shared key.
TLSPSKIdentity=psk_remote
# Full pathname of a file containing the pre-shared key.
TLSPSKFile=/etc/zabbix/zabbix_proxy.psk
Now here’s the interesting part: the part where we set up encryption for outgoing connections. We don’t set up any encryption for incoming connections, because we’re running our proxy in the active mode, which means a connection between the server and the proxy will always come from the proxy to the server.
The first parameter is TLSConnect, which tells the proxy what mode it should use to connect to the server. It can either be unencrypted, psk or cert.
Once we’ve told our proxy we want to talk with the server, there are two parameters we must define:
TLSPSKIdentity: the “identity” of the pre-shared key, aka a non-secret string identifier. You can basically input whatever you want here.TLSPSKFile: the file containing your secret pre-shared key.
Zabbix’s documentation provides two ways to generate the PSK, which is basically a random 32-byte long string, using either OpenSSL or GnuTLS. I used GnuTLS, which looked like this:
$ psktool -u psk_identity -p database.psk -s 32
Generating a random key for user 'psk_identity'
Key stored to database.psk

$ cat database.psk
psk_identity:9b8eafedfaae00cece62e85d5f4792c7d9c9bcc851b23216a1d300311cc4f7cb
Let’s just clarify a point here: the key isn’t the one we’re using. The code block above is just an exact copy from Zabbix’s documentation.
Now that we have generated our database.psk file, we’ll need to transform it a bit so Zabbix can read it, by removing the identity and the colon, leaving only the key in the file. Using the file generated in the previous example, it should now look like this:
$ cat database.psk
9b8eafedfaae00cece62e85d5f4792c7d9c9bcc851b23216a1d300311cc4f7cb
You may of course rename the file and move it on the proxy’s host. The next step is to re-open the proxy configuration file, copy the .psk file’s absolute path as the value for the TLSPSKFile parameter, restart the proxy and voilà! The proxy should now be able to talk to the server! Or at least try to, because the server doesn’t know our proxy. Let’s see how we can fix this.
Server meets proxy
Now you’ll need to log into your Zabbix server’s web interface (as an administrator), and click on the “Proxies” sub-menu from the “Administration” menu. From there, click “Create proxy”.

Fill in your proxy’s name, but don’t click “Add” yet. Also, make sure the name is exactly the same as the Hostname you specified in the proxy’s configuration (it’s case-sensitive).

Then click “Encryption” (at the top of the gray block, next to “Proxy”), uncheck “No encryption”, check “PSK”, fill in the PSK’s identity (again, this needs to be exactly the same as the value you set to TLSPSKIdentity, and is case-sensitive), and the PSK (which is the content of the .psk file we generated just before).
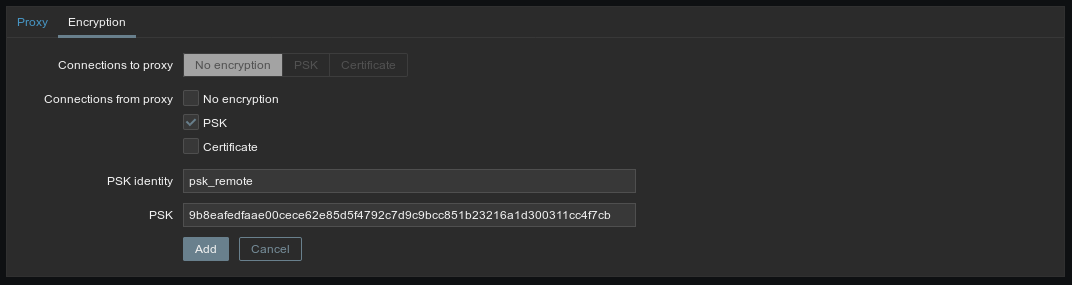
Now you can click “Add”, and voilà! Your server now knows your proxy and will be happy to talk to it, using the PSK to encrypt all communications.
A few words on the agents
Now this whole setup won’t disturb on-host agents that much. They talk to a proxy the same way they talk to a server. However, you’ll need to make them talk to the proxy, and this is done in two parts:
- In the agent’s configuration file, set the
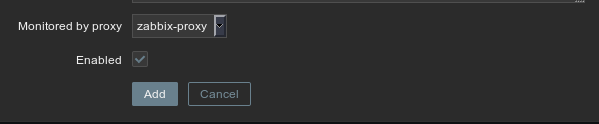
Serverparameter to the proxy’s address, not the Zabbix server’s. - In the server’s web interface, when creating the host, make sure to select the proxy in the “Monitored by proxy” dropdown at the bottom of the main view:
There’s one special case, though, it’s the agent that’s on the proxy’s host. If you use it with the same configuration than the other agents in your remote infrastructure, it will make that the proxy forward its own monitoring data, which is not good if you want to be able to investigate incidents efficiently (and can lead to countless issues). So I’d advise to make it talk (in an encrypted fashion) directly to the Zabbix server. The agent’s configuration is almost exactly the same than the proxy’s, in fact we can even use the same encryption key. At CozyCloud, we only append these lines to the proxy’s agent configuration:
TLSConnect=psk
TLSAccept=psk
TLSPSKIdentity=psk_remote
TLSPSKFile=/etc/zabbix/zabbix_proxy.psk
Also don’t forget to change the agent’s Server configuration parameter to replace it with your server’s public address instead of the proxy’s internal address.
And voilà!
There you go, the whole thing is set up and ready to work! You can make sure encryption is turned on using tcpdump like this:
$ tcpdump -X -i eth0 dst host ZABBIX SERVER IP/HOSTNAME and dst port 10051
Make sure this command line is run from the proxy’s host. You may want to change the interface (here eth0) and the port the Zabbix server listens to (here 10051) accordingly with your own setup.
If encryption is indeed turned on, all of the translated content sent from the proxy to the server (the right part of the output) must be un-understandable gibberish.
If no traffic goes between your proxy and your server (i.e. if tcpdump shows nothing), you might want to update the firewall rules on your Zabbix server’s host to allow incoming connection on port 10051 (or any other port you might have configured the server to listen to).
If you were not aware of it, this blog post was the first episode of my One post a week series, in which I’m trying to keep up with writing a blog post a week to help me get better at sharing my knowledge. If you have any feedback on this post, make sure to hit me up on Twitter, I’ll be more than happy to discuss it with you 🙂
I’d also like to thank Nicolas who spent so much time helping me with this setup and explaining so much things on Zabbix to me, along with Thibaut and Sébastien for their early feedback on this post, which helped me make it even better.
See you next week for a new post!