Enter the Matrix
As you might know if you’ve been following me on Twitter for some time (or if you know me in real life), I’m very fond of free software and decentralisation. I love free software because it matches the philosophy I want to live by, and decentralisation because it enlarges a user’s freedom and individuality, and I find working on decentralised systems fascinating. Doing so forces one to change their way of designing a system entirely, since most of the Internet now consists of centralised services, which leads people to only learn how to design and engineer these.
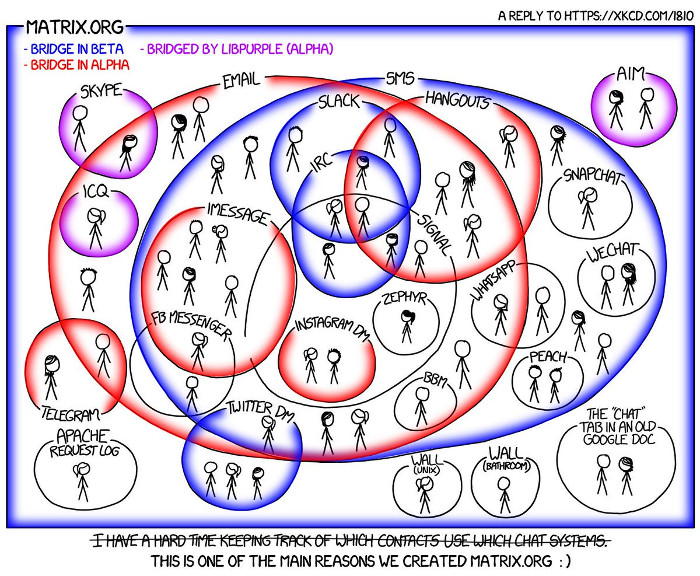
Today I want to tell you about one of my favorite decentralised free software projects right now: Matrix. Let’s get things straight first, I’m talking about neither the science-fiction franchise, nor the nightclub in Berlin. Matrix is a protocol for decentralised, federated and secure communications, created and maintained by New Vector, a company split between London, UK and Rennes, France (which I joined for an internship in London during the last summer). It’s based on RESTful HTTP/JSON APIs, documented in open specifications, and is designed to be usable for anything that requires real-time-ish communications, from instant messaging to IoT. Some people are also experimenting with using Matrix for blogs, RSS reader, and other stuff that’s quite far from what you’d expect to see with such a project. Despite that, however, it’s currently mainly used for instant messaging, especially through the Riot client (which is also developed by New Vector).
Matrix also distances itself from the “yet another comms thing” argument with its philosophy: it’s not another standard for communications, but one that aims at binding all communications services together, using bridges, integration et al. For example, at CozyCloud, we have a Matrix room that’s bridged to our public IRC channel, meaning that every message sent to the Matrix room will get in the IRC channel as well, and vice-versa. I’m even fiddling around in my free time to bridge this room with a channel on our Mattermost instance, to create a Mattermost<->Matrix<->IRC situation and allow the community to interact with the team without members from the latter having to lose time firing up another chat client and looking at it in addition to internal communications.
There’s also been quite some noise around Matrix lately with the French government announcing its decision to go full Matrix for their internal communications, using a fork of Riot they might also release as free software to the wide world in the future.
Under the hood
It’s great to introduce the topic, but I guess you were expecting more of a technical and practical post, so let’s get into how Matrix works. Quick disclaimer, though: I won’t go too much in depth here on how Matrix works (because if I do, the post would be quite too long and I’d never get time to even finish it in a week), and will mainly focus on its core principles and how to use it in the most basic way.
As I mentioned before, Matrix is decentralised and federated. The decentralised bit means that you can run a Matrix server on your own server (quite like other services such as Mattermost), and the federated one means that two Matrix servers will be able to talk to one another. This means that, if someone (let’s call her Alice) hosts her own Matrix server at matrix.alice.tld, and want to talk to a friend of her (let’s call him Bob), who also hosts his own Matrix server at matrix.bob.tld, that’s possible and matrix.alice.tld will know how to talk to matrix.bob.tld to forward Alice’s message to Bob.
Glossary break:
- There are a few server types in the Matrix specifications. The homeservers (HS) are the servers that implement the client-server and federation APIs, i.e. the ones that allows actual messages to be sent from Alice to Bob. In my example, in which I was referring to homeservers as “Matrix servers”,
matrix.alice.tldandmatrix.bob.tldare homeservers. Among the other server types are the identity servers (IS) that allows one to host third-party identifiers (such as an email address or a phone number) so people can reach them using one of them, and application services (AS) which are mainly used to bridge an existing system to Matrix (but are not limited to that). In this post, I’m only going to cover the basic use of homeservers, since knowledge about the other types isn’t required to understand the bases of how Matrix works. - In the Matrix spec, both Alice and Bob are identified by a Matrix ID, which takes the form
@localpart:homeserver. In our example, their Matrix IDs could respectively be@Alice:matrix.alice.tldand@Bob:matrix.bob.tld. Matrix IDs’ form actually follows a broader one, taken by any Matrix entity, which is*localpart:homeserver, where*is a “sigil” character which is used to identify the entity’s type. Here, the sigil character@states that the entity is a Matrix ID.
Three roomies on three servers
Now that we have our two users talking with each other, let’s take a look at how third user (let’s call him Charlie), also hosting his own homeserver (at matrix.charlie.tld), can chat with both of them. This is done using a room, which can be defined as the Matrix equivalent of an IRC channel. As any entity in Matrix, the room has an ID which takes the general form with the ! sigil character. However, although it contains a homerserver’s name in its ID, and unlike a user ID, a room isn’t bound to any homeserver. Actually, the homeserver in the room ID is the homeserver hosting the user that created the room.
Technically speaking, if Alice wants to send a message in the room where both Bob and Charlie are, she’ll ask her homeserver to send a message in that room, which will look into its local database which homeservers are also part of that room (in our example, Bob’s and Charlie’s), and will send the message to each of them individually (and each of them will display the message to their users in the room, i.e. Bob’s server will display it to Bob). Then, each homeserver will keep track of the message in their local database. This means two things:
- Every homeserver in a room keeps a content of the room’s history.
- If a homeserver in a room goes down for any reason, even if it’s the homeserver which has its name in the room’s ID, all of the other homeservers in the room can keep on talking with each other.
Broadly speaking, a room can be schematised as follows:
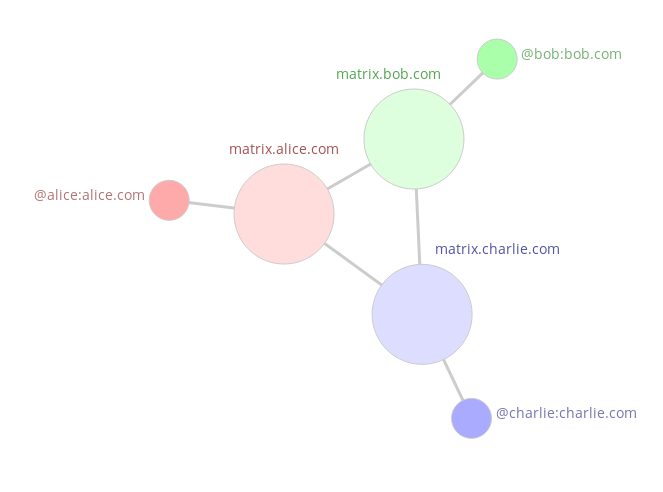
This image is a capture of the interactive explanation on how Matrix works named “How does it work?” on Matrix’s homepage, which I’d really recommand checking out. That’s why the Matrix IDs and homeservers’ names aren’t the same as in my example.
For what it’s worth, I took a shortcut earlier since, in the Matrix spec, 1-to-1 chats are also rooms. So technically speaking, Alice and Bob were already in a room before Charlie wanted to chat with them.
It might also be worth noting that a room can have an unlimited number of aliases, acting as addresses for the room, which users can use to join it if it’s public. Their syntax takes the general form we saw earlier, using # as the sigil character. This way, !wbtZVAjTSFQzROqLrx:matrix.org becomes #cozy:matrix.org, which, let’s be honest, is quite easier to read and remember. As with a room’s ID, its homeserver part is the homeserver hosting the user who created the alias, which means that I can create #cozycloud:matrix.trancendances.fr if I have enough power level, as I’m using this homeserver.
As I quickly hinted at, a room can be either public or private. Public rooms can be joined by anyone knowing one of the room’s alias (or getting it from the homeserver’s public rooms directory if it’s published there), and private rooms work on an invite-only basis. In both cases, if the homeserver doesn’t already have a user in the room, it will ask another homeserver to make the join happen (either the homeserver alias which name is in the homeserver part of the alias for a public room, or the homeserver the invite is originating from for a private room).
Events, events everywhere
Now that we know what a room is, let’s talk about what’s passing inside of one. Earlier, I’ve been talking about messages, which are actually called “events”. Technically speaking, a Matrix event is a JSON object that’s sent in a room and dispatched to all other members of the room. It, of course, has an ID that’s generated by the homeserver hosting the user who sent the message, taking the general form we saw earlier and the $ sigil character. This JSON has metadata, such as a class name to identify different event types, an author, a creation timestamp, etc. It basically looks like this:
{
  "origin_server_ts": 1526072700313,
  "sender": "@Alice:matrix.alice.tld",
  "event_id": "$1526072700393WQoZb:matrix.alice.tld",
  "unsigned": {
    "age": 97,
    "transaction_id": "m1526072700255.17"
  },
  "content": {
    "body": "Hello Bob and Charlie! Welcome to my room :-)",
    "msgtype": "m.text"
  },
  "type": "m.room.message",
  "room_id": "!TCnDZIwFBeQyBCciFD:matrix.alice.tld"
}
The example above is an event sent from Alice to Bob and Charlie in the room they’re all in. It’s a message, as hinted at by the m.room.message class name in the type property. The content property, which must be an object, contains the event’s actual content. In this case, we can see the message is text, and the text itself. This precision is needed because m.room.message can be a text, but also an image, a video, a notice, etc. as mentioned in the spec.
The unsigned property here only means the data in it mustn’t be taken into account when computing and verifying the cryptographic signature used by homeserver to pass the event to another homeserver.
The Matrix spec defines three kind of events that can pass through a room:
- Timeline events, such as messages, which form the room’s timeline that’s shared between all homeservers in the room.
- State events, that contain an additional
state_keyproperty, and form the current state of the room. They can describe room creation (m.room.create), topic edition (m.room.topic), join rules (i.e. either invite-only or public,m.room.join_rules), membership update (i.e. join, leave, invite or ban,m.room.memberwith the Matrix ID of the user whose membership is being updated as thestate_key). Just like timeline events, they’re part of the room’s timeline, but unlike them, the latest event for a{type, state_key}duo is easily retrievable, as well as the room’s current state of the room, which is actually a JSON array contaning the latest events for all{type, state_key}duos. The Matrix APIs also allows one to easily retrieve the full state the room was at when a given timeline message was propagated through the room, and each state event refers to its parent. - Euphemeral events, which aren’t included in the room’s timeline, and are used to propagate information that doesn’t last in time, such as typing notification ("[…] is typing…").
Now, one of the things I really like about Matrix is that, besides the base event structure, you can technically put whatever you want into an event. There’s no constraint on its class name (except it can’t start with m., which is a namespace reserved for events defined in the spec), nor on its content, so you’re free to create your own events as you see fit, whether they are timeline events, state events or both (I’m not sure about euphemeral events, though). That’s how you can create whole systems using only Matrix as the backend.
Matrix events can also be redacted. This is the equivalent of a deletion, except the event isn’t actually deleted but stripped from its content so it doesn’t mess with the room’s timeline. The redacted event is then dispatched to every homeserver in the room so they can redact their local copy of the event as well. Regarding editing an event’s content, it’s not possible yet, but it’s a highly requested feature and should be available in the not so distant future.
A very basic client
Now I guess you’re wondering how you can use Matrix for your project, because learning the core principles is great but that doesn’t explain how to use the whole thing.
In the following steps, I’ll assume a few things:
- The homeserver you’re working with is
matrix.project.tld, and its client-server API is available on port 443 through HTTPS. - Your user is named
Alice. Note that you must change this value for real life tests, because the Matrix ID@Alice:matrix.orgis already taken. - Your user’s password is
1L0v3M4tr!x.
Note that I’ll only cover some basic use of the client-server spec. If you want to go further, you should have a look at the full spec or ask any question in the #matrix-dev room. I also won’t cover homeserver setup, here (though I might do just that in a future post). My goal here is mainly to give you a look at how the client-server APIs globally works rather tha creating a whole shiny app which would take too long for a single blog post.
It might also be worth noting that each Matrix API endpoint I’ll name in the rest of this post is a clickable link to the related section of the Matrix spec, which you can follow if you want more complete documentation on a specific endpoint.
Registering
Of course, your user doesn’t exist yet, so let’s register it against the homeserver.
The endpoint for registration is /_matrix/client/r0/register, which you should request using a POST HTTP request. In our example, the request’s full URL is https://matrix.project.tld/_matrix/client/r0/register.
Note that every endpoint in the Matrix spec always starts with /_matrix/.
The request body is a JSON which takes the following form:
{
  "username": "Alice",
  "password": "1L0v3M4tr!x",
}
Here, the username and password properties are exactly what you think it is. The Matrix ID generated for a new user contains what’s provided in the username property as the localpart.
Fire this request. You’ll now get a 401 status code along with some JSON, which looks like this:
{
    "flows": [
        {
            "stages": [
                "m.login.dummy"
            ]
        },
        {
            "stages": [
                "m.login.email.identity"
            ]
        }
    ],
    "params": {},
    "session": "HrvSksPaKpglatvIqJHVEfkd"
}
Now, this enpoint uses a part of the spec called the User-Interactive Authentication API. This means that authentication can be seen as flows of consecutive stages. That’s exactly what we have here: two flows, each containing one stage. This example is a very simple one, but it can get quite more complex, such as:
{
    "flows": [
        {
            "stages": [
                "m.login.recaptcha"
            ]
        },
        {
            "stages": [
                "m.login.email.identity",
                "m.login.recaptcha"
            ]
        }
    ],
    "params": {
        "m.login.recaptcha": {
            "public_key": "6Le31_kSAAAAAK-54VKccKamtr-MFA_3WS1d_fGV"
        }
    },
    "session": "qxATPqBPdTsaMBmOPkxZngXR"
}
Here we can see two flows, one with a single stage, the other one with two stages. Note that there’s also a parameter in the params object, to be used with the m.login.recaptcha flow.
Because I want to keep it as simple as possible here, let’s get back at our initial simple example, and use the first one-stage flow. The only stage in there is m.login.dummy, which describes a stage that will success everytime you send it a correct JSON object.
To register against this stage, we’ll only add a few lines to our initial request’s JSON:
{
  "auth": {
    "type": "m.login.dummy",
    "session": "HrvSksPaKpglatvIqJHVEfkd",
  },
  "username": "Alice",
  "password": "1L0v3M4tr!x",
}
Note that the value to the session property in the newly added auth object is the value from session taken from the homeserver’s response to our intial request. This auth object will tell the homeserver that this request is a follow-up to the initial request, using the stage m.login.dummy. The homeserver will automatically recognise the flow we’re using, and will succeed (because we use m.login.dummy), returning this JSON along with a 200 status code:
{
  "access_token": "olic0yeVa1pore2Kie4Wohsh",
  "device_id": "FOZLAWNKLD",
  "home_server": "matrix.project.tld",
  "user_id": "@Alice:matrix.project.tld"
}
Let’s see what we have here:
- The
home_serverproperty contains the address of the homeserver you’ve registered on. This can feel like a duplicate, but the Matrix spec allows for a homeserver’s name to differ from its address, so here’s why it mentions it. - The
user_idproperty contains the newly generated Matrix ID for your user. - The
device_idproperty contains the ID for the device you’ve registered with. A device is bound to an access token and E2E encryption keys (which I’m not covering in this post). - The
access_tokenproperty contains the token you’ll use to authenticate all your requests to the Matrix client-server APIs. It’s usually much longer than the one shown in the example, I’ve shortened it for readability’s sake.
Registering an user instantly logs it in, so you don’t have to do it right now. If, for any reason, you get logged out, you can log back in using the endpoint documented here.
Creating our first room
Now that we have an authenticated user on a homeserver, let’s create a room. This is done by sending a POST request to the /_matrix/client/r0/createRoom endpoint. In our example, the request’s full URL is https://matrix.project.tld/_matrix/client/r0/createRoom?access_token=olic0yeVa1pore2Kie4Wohsh. Note the access_token query parameter, which must contain the access token the homeserver previously gave us.
There are a few JSON parameters available which I won’t cover here because none of them are required to perform the request. So let’s send the request with an empty object ({}) as its body.
Before responding, the homeserver will create the room, fire a few state events in it (such as the initial m.room.create state event or a join event for your user). It should then respond with a 200 status code and a JSON body looking like this:
{
    "room_id": "!RtZiWTovChPysCUIgn:matrix.project.tld"
}
Here you are, you have created and joined your very first room! As you might have guessed, the value for the room_id property is the ID of the newly created room.
Messing with the room’s state
Browsing the room’s state is completely useless at this stage, but let’s do it anyway. Fetching the whole room state, for example, is as easy as a simple GET request on the /_matrix/client/r0/rooms/{roomId}/state endpoint, where {roomId} is the room’s ID. If you’re following these steps using curl requests in bash, you might want to replace the exclamation mark (!) in the room’s ID with its URL-encoded variant (%21). Don’t forget to append your access token to the full URL as shown above.
The request should return a JSON array containing state events such as:
{
  "age": 654742,
  "content": {
    "join_rule": "public"
  },
  "event_id": "$1526078716401exXBQ:matrix.project.tld",
  "origin_server_ts": 1526078716874,
  "room_id": "!RtZiWTovChPysCUIgn:matrix.project.tld",
  "sender": "@Alice:matrix.project.tld",
  "state_key": "",
  "type": "m.room.join_rules",
  "unsigned": {
    "age": 654742
  }
}
Now let’s try to send our own state event in the room, shall we? I order to do that, you’ll need to send a PUT request to the /_matrix/client/r0/rooms/{roomId}/state/{eventType}/{stateKey} endpoint, repacing the room’s ID, the event’s type and its state key with the right values. Note that if your state key is an empty string, you can just omit it from the URL. Again, don’t forget to append your access token!
The body for our request is the event’s content object.
Let’s create a tld.project.foo event with bar as its state key, and {"baz": "qux"} as its content. To achieve that, let’s send a PUT request to /_matrix/client/r0/rooms/!RtZiWTovChPysCUIgn:matrix.project.tld/state/tld.project.foo/bar?access_token=olic0yeVa1pore2Kie4Wohsh (from which I’ve stripped the protocol scheme and FQDN so it doesn’t appear too long in the post) with the fillowing content:
{
  "baz": "qux"
}
The homeserver then responds with an object only containing an event_id property, which contains the ID of the newly created state event.
If we retry the request we previously made to retrieve the whole room state, we can now see our event:
{
    "age": 58357,
    "content": {
        "baz": "qux"
    },
    "event_id": "$1526080218403sbpku:matrix.project.tld",
    "origin_server_ts": 1526080218639,
    "room_id": "!RtZiWTovChPysCUIgn:matrix.project.tld",
    "sender": "@Alice:matrix.project.tld",
    "state_key": "bar",
    "type": "tld.project.foo",
    "unsigned": {
        "age": 58357
    }
}
Note that sending an update of a state event is done the same way as sending a new state event with the same class name and the same state key.
Sending actual messages
Sending timeline events is almost the same thing as sending state events, except it’s done through the /_matrix/client/r0/rooms/{roomId}/send/{eventType}/{txnId} endpoint, and it uses one parameter we haven’t seen yet: the txnId, aka transaction ID. That’s simply a unique ID allowing identification for this specific request among all requests for the same access token. You’re free to place whatever you want here, as long as you don’t use the same value twice with the same access token.
Regarding the request’s body, once again, it’s the event’s content.
Retrieving timeline events, though, is a bit more complicated and is done using a GET request on the /_matrix/client/r0/sync endpoint. Where it gets tricky is in the fact that this endpoint isn’t specific to a room, so it returns every event received in any room you’re in, along with some presence event, invites, etc.
Once you’ve done such a request (again, with your access token appended to it), you can locate timeline events from your room in the JSON it responds with by looking at the rooms object, which contains an object named join which contains one object for each room you’re in. Locate the !RtZiWTovChPysCUIgn:matrix.project.tld room (the one we’ve created earlier), and in the corresponding object you’ll see the state, timeline and euphemeral events for this room.
Inviting a folk
So far, Alice has registered on the homeserver and created her room, but she feels quite alone, to be honest. Let’s cheer her up by inviting Bob in there.
Inviting someone into a room is also quite simple, and only requires a POST request on the /_matrix/client/r0/rooms/{roomId}/invite endpoint. The request’s body must contain the invited Matrix ID as such:
{
  "user_id": "@Bob:matrix.bob.tld"
}
Note that the request is the same if Bob has registered on the same server as Alice.
If all went well, the homeserver should respond with a 200 status code and an empty JSON object ({}) as its body.
In the next request on the /_matrix/client/r0/sync he’ll made, Bob will now see an invite object inside the rooms one contaning the invite Alice sent him, containing a few events including the invite event:
{
  "invite": {
    "!RtZiWTovChPysCUIgn:matrix.project.tld": {
      "invite_state": {
        "events": [
          {
            "sender": "@Alice:matrix.project.tld",
            "type": "m.room.name",
            "state_key": "",
            "content": {
              "name": "My very cool room"
            }
          },
          {
            "sender": "@Alice:matrix.project.tld",
            "type": "m.room.member",
            "state_key": "@Bob:matrix.bob.tld",
            "content": {
              "membership": "invite"
            }
          }
        ]
      }
    }
  }
}
Now Bob will be able to join the room by sending a simple POST request to the /_matrix/client/r0/rooms/{roomId}/join endpoint.
Alice meets Bob
So here we are, with a fresh room where Alice and Bob are able to interact with one another, with everything done using HTTP requests that you could do with your terminal using curl. Of course, you don’t always have to do it that manually, and there are Matrix SDKs for various languages and platforms, including JavaScript, Go, Python, Android, iOS, and a lot more. The full list is available right here.
If you want to dive a bit deeper into the Matrix APIs, I’d advise you to have a look at the spec (even though it still needs a lot of work) and what the community has done with it on the Try Matrix Now! page on Matrix’s website.
I hope you found this journey into Matrix’s APIs as interesting as I did when I first heard of the project. Matrix is definitely something I’ll keep playing with for a while, and might have some big news related to some Matrix-related projects I’m working on to share here in the coming months.
As always, I’d like to thank Thibaut for proofreading this post and giving me some useful early feedback on it. If you want to share your feedback on this post with me too, don’t hesitate to do so, either via Twitter or through Matrix, my own Matrix ID being @brendan:abolivier.bzh!
See you next week for a new post 🙂